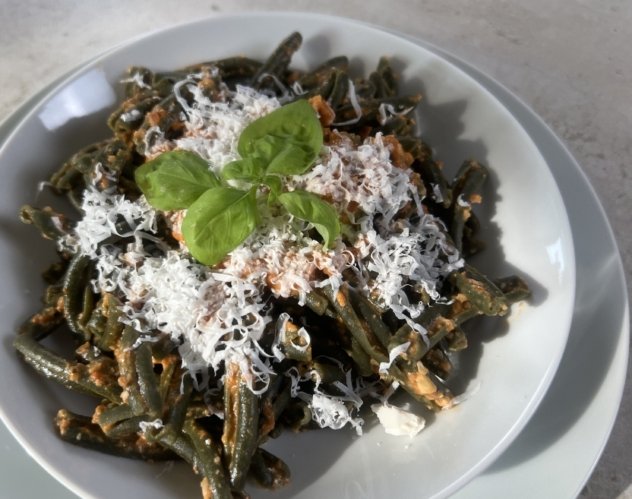
Posts

Here come more ideas for your out-of-home lunch! In our lunch box today, protein, vitamin and fibre are the stars.  What am I talking about? Of a delicious Roast beef with aubergine cream to be served with a slice of bread for a complete, balanced and tasty lunch to take with you for every occasion.

In my ideas for out-of-home meals you find the carb count of the whole lunch box: it will be super easy for our kids to calculate how much insulin to inject and lunch will be a joyful moment to share with friends.

If you need a container to take with you, find here the LUNCH BOXwe use.

Have a look at the recipe to prepare my Venere rice salad with cherry tomatoes and pistachio nuts.

Roast beef with aubergine cream

15.9g carbohydrates for the whole lunch box

Ingredients for 1 lunch box

  • 300g aubergine
  • 140g roast beef, sliced
  • 15g raisins or dried apricots
  • 10g desalted capers
  • 10g pine nuts
  • 1 tbsp of lemon juice
  • 3 mint leaves
  • aromatic herbs to taste
  • extra virgin olive oil
  • salt

**Ingredients specific for celiacs

*Ingredients whose labels must read “gluten-free” (in Italy they may be listed on  Prontuario AIC)

Preparation

  1. Cut the aubergine into dices of a couple of centimetres, sprinkle with salt and put in a strainer to draw out excess moisture.
  2. Pat the aubergine dry with a piece of kitchen paper and sautée it in a non-stick pan with a dribble of oil until cooked.
  3. Blend 2/3 of the eggplant with a tablespoon of lemon juice, a tablespoon of oil and 3 mint leaves; adjust salt and pepper, flavour with chopped aromatic herbs to taste.
  4. Dress the remaining aubergine with a tablespoon of vinegar, pine nuts, raisins and capers.
  5. Assemple the lunch box with slices of roast beef topped with aubergine cream and complete with the aubergine salad.

roastbeef con crema di melanzane

Version with gluten of Roast beef with aubergine cream 

The recipe contains only naturally gluten free ingredients, so no adaptation is necessary for its version with gluten.


Are you looking for new ideas for out-of-home meals at the office or university? Here is an easy recipe for a tasty and healthy Venere rice salad for a meal to take with you.

For our kids who need to eat gluten free and to count the carbohydrates contained in the meal, the lunch box is the perfect solution to travel, but the question is: what can I cook that can be quick and easy to carry? One of the many answers is this Venere rice salad with cherry tomatoes and pistachio nuts.

This is where we found our LUNCH BOX.

Follow me not to run short of ideas for out-of-home meals! E non perderti il Roastbeef con crema di melanzane.

Venere rice salad with cherry tomatoes and pistachio nuts

60.2g carbohydrates for the whole lunch box

Ingredients for 1 lunch box

  • 120g cherry tomatoes
  • 70g Venere rice (Italian black rice) (weight when cooked 140g)
  • 15g Pecorino cheese
  • 15g shelled pistachios, unsalted
  • extra virgin olive oil
  • mint and basil
  • oregano
  • salt

**Ingredients specific for celiacs

*Ingredients whose labels must read “gluten-free” (in Italy they may be listed on  Prontuario AIC)

Preparation

  1. Boil the rice in plenty of slightly salted boiling water and, if you don’t have time, choose a pre-cooked Venere rice that will be ready in a few minutes.
  2. Cut the cherry tomatoes in half placing the cut side on the tin lined with parchment paper; sprinkle with salt, oregano and extra virgin olive oil. Put them in a preheated oven at 180°C for about 15 minutes or anyway until they start caramelising.
  3. Coarsely grate the Pecorino cheese and slightly chop the pistachio nuts.
  4. Dress the Venere rice with the roasted tomatoes with their juice, grated Pecorino, pistachio nuts and chopped mint and basil adjusting salt, if needed.

Riso venere con pomodorini e pistacchi

Version with gluten of Venere rice salad with cherry tomatoes and pistachio nuts

The recipe contains only naturally gluten free ingredients, so no adaptation is necessary for its version with gluten.


Are you looking for more ideas for your out-of-home lunch? Eating out is indispensable not only for those who work, but also for those who study, so the time has come to share some recipes for your lunch box or for what Japanese people call “bento“… Well, many ideas for lunch boxes that are complete, balanced and tasty to take with you on every occasion.

So, for our young ones going to university and having to eat gluten free and to count carbohydrates easily, the lunch box is a faithful travel mate that contributes to turning the lunch break into a joyful moment.

We found the perfect lunch box for our needs at our friend’s store “I love my house” whom I always ask for help when I am looking for equipment and kitchen solutions: here is where you can find our LUNCH BOX.

This is the beginning of a project that is very dear to me because lunch is a key meal, especially for out kids and we cannot allow ourselves to run short of ideas!

Stay tuned for many more fantastic recipes! Meanwhile, have a look at my Coronation pasta salad.

Pasta with chickpea cream and broccoli

85.91g carbohydrates for the whole lunch box

Ingredients for 1 lunch box

  • 110g broccoli florets
  • 100g boiled chickpeas
  • 70g Massimo Zero Organic Pipe**
  • 15g dried apricots
  • 1 tbsp of lemon juice
  • paprika
  • extra virgin olive oil
  • parsley
  • salt

**Ingredients specific for celiacs

*Ingredients whose labels must read “gluten-free” (in Italy they may be listed on  Prontuario AIC)

Preparation

  1. Boil pasta al dente in salted boiling water, drain and dress it with a dribble of extra virgin olive oil leaving the pasta to cool down.
  2. Blend 70g chickpeas with about 50g water, lemon juice, salt and pepper and a dribble of oil to obtain a cream.
  3. Dress the remaining chickpeas with paprika, pepper and oil to taste, together with blanched broccoli florets.
  4. Season the pasta with the chickpea and broccoli mixture, then add the dried apricots cut in pieces and pour everything in the lunch box.
  5. Put the chickpea cream in the second container or on the pasta completing with a dusting of chopped parsley and a dribble of oil.  Mix well before eating.

Version with gluten of Pasta with chickpea cream and broccoli 

The recipe contains only naturally gluten free ingredients, so no adaptation is necessary for its version with gluten; however, if you want, you can replace Massimo Zero corn and rice pasta with a durum wheat alternative.

What is your favourite cake? How many times have you been asked that! And I never know how to answer, but on second thought, the Fresh Fruit Tart with naturally gluten-free flours could take the podium.

So this year I decided to publish the recipe on the occasion of my birthday, because, as it is often happens to who cook, we end up making our own birthday cake! For a garden party, you can also opt for Tartlets with strawberries.

Here’s how to cook it and two different finishes that have delighted the family on different occasions.

Fresh fruit tart with naturally gluten-free flours

50.31g carbohydrates per 100g of tart

Ingredients for the shortbread

  • 150g wholemeal rice flour*
  • 100g almonds, peeled
  • 100g sugar
  • 80 g butter
  • 60g corn starch*
  • 40g potato starch*
  • 2 eggs
  • 8g baking powder*
  • grated lemon rind
  • 1 pinch of salt

Ingredients for the pastry cream

  • 500g semi-skimmed milk
  • 150g sugar
  • 40g corn starch*
  • 5 egg yolks
  • a bit of vanilla from the pod
  • rind of 1 lemon (optional)

Ingredients to complete

  • 400g mixed fruit
  • jelly spray for tarts*

*Ingredients whose labels must read “gluten-free” (or, in Italy, present on  Prontuario AIC)

Preparation

  1. Blend the almonds to obtain a flour, then place it in a bowl or planetary mixer with all the other shortcrust pastry ingredients. Mix quickly and when you have obtained a homogeneous dough, place it in the refrigerator to rest for about 30 minutes wrapped in cling film.
  2. Meanwhile, prepare the custard. Put the milk in a small saucepan on the stove with the lemon peel (if you like) and bring it almost to the boil. In another container, lightly beat the egg yolks and the sugar with a whisk and when they start to whip up, add the cornflour, making care not to let lumps form, and the vanilla bean tip.
  3. Very slowly and always stirring with the whisk, start pouring the boiling milk over the mixture and, once it has all been poured in, return it to the heat until the cream starts to thicken. It is important that you remove the cream from the heat as soon as it starts to thicken, otherwise it will be too hard once it has cooled. Let cool and remove the lemon peel.
  4. Take the shortcrust pastry out of the refrigerator, roll it out on a sheet of baking paper to line a baking tin 24cm in diameter or larger (depending on the thickness you like for the tart, you might have some shortcrust pastry left over that you can use to make breakfast biscuits – delicious!). To blind bake the tart, place a sheet of baking paper filled with beans or rice on top of the shortcrust base and bake for about 15 minutes in a static oven preheated to 180°C. Then remove the baking paper with the beans or rice and finish baking the shortcrust base.
  5. Now compose the cake. Pour the custard over the base, decorate with the washed and cut fruit and sprinkle the jelly over the fruit so that it does not turn brown. Keep the tart in the fridge until it is ready to be eaten and… enjoy the celebrations!

crostata di frutta fresca

Version with gluten of Fresh Fruit Tart with natural flours

The recipe contains only naturally gluten free ingredients, so no adaptation is necessary for its version with gluten.

Rolls are a bit like meatballs: one leads to another! Here is an idea for preparing delicious Romaine lettuce rolls with a tasty and colourful filling that you can also prepare with me by by watching the video recipe.

I wanted to propose a vegetarian filling because we know that healthy eating guidelines recommend consuming meat no more than 3 times a week (1 time red meat, 2 times white meat), so I am always looking for tasty alternatives to meat so that the rest of the family will not notice its absence. Another idea? Also try the Vegetable au gratin.

Even the choice of lettuce is designed to change the flavours as much as possible, in short, variety is the key!

Romaine lettuce rolls

14.91g carbohydrates per 100g

Ingredients

  • 250g Romaine lettuce
  • 200g grated cheese (choice of Caciocavallo, Parmesan, Pecorino, etc., also mixed together)
  • 100g breadcrumbs Nutrifree**, and a little more to dust the surfce with
  • 2 eggs
  • 50g dried tomatoes
  • 15g dried Porcini mushrooms
  • vegetable stock
  • extra virgin olive oil
  • pepper

**Ingredients specific for celiacs

*Ingredients whose labels must read “gluten-free” (or, in Italy, present on  Prontuario AIC)

Preparation

  1. Wash the leaves of Romaine lettuce and blanch them for less than a minute in slightly salted boiling water. Drain the leaves using a slotted spoon and plunge them in very cold water. Take the leaves out of the water and lay them on a tray or cloth so that they drain a bit.
  2. Prepare the filling. Heat the stock and use it to scald the breadcrumbs, which should be moist but not creamy. Let it cool down.
  3. Blend the dried Porcini to a powder; chop the dried cherry tomatoes.
  4. Add 170g grated cheese to the breadcrumbs, also incorporate cherry tomatoes, Porcini mushrooms and the whole eggs. Stir and add pepper (salt should not be needed).
  5. Take the lettuce leaves, remove the centre rib, place a roll of stuffing in the centre and wrap it, forming a roll for each leaf. Place the rolls in an oven dish, sprinkle with the remaining grated cheese, breadcrumbs and a drizzle of oil and bake au gratin in a static oven preheated to 200°C for about 15 minutes.

involtini di lattuga

Version with gluten of Romaine lettuce rolls

Replace the Nutrifree breadcrumbs with an equal amount of conventional breadcrumbs, while all other ingredients remain unchanged.

How to prepare a Pinzimonio that no one can say no to? A cream of Radicchio Variegato di Castelfranco and grilled Parmigiano Reggiano rinds for a recipe that is also anti-waste.

Radimonio? A cream made with Radicchio Variegato to make Pinzimonio irresistible 

The journey to discover the products protected by the Consorzio Tutela del Radicchio di Treviso PGI and Radicchio Variegato di Castelfranco PGI, true ‘winter flowers‘ because of their splendid shape. To represent my region of origin, Emilia Romagna, and my family tradition, that of Parmigiano Reggiano production, I thought of a custom of peasant cuisine that I have always loved because it is an expression of respect for food and the commitment behind its preparation: the use of grilled Parmigiano Reggiano rinds.

All the work behind Radicchio made me inevitably associate it with the product my family has always been dedicated to. Radicchio is marked by long waits in the countryside and Parmesan cheese has to wait years for nature to take its course to give us unique and unrepeatable flavours. That is why I believe it is a crime to waste even a small part of the product, and farming culture teaches us never to do so.

A modern interpretation thus inspired me to come up with a way to enjoy a truly unusual snack or aperitif because it sees Radicchio variegato, normally eaten raw, cooked for a few minutes in a pan and a ‘scrap’ of cheese turned into a very tasty crunchy stick to scoop up a cream that also carries the aromatic note of another great product of the Veneto region, Recioto wine. Furthermore, the blade-shaped leaves of late Radicchio are ideal to complete the tasting experience.

Trying is believing.

What Radicchio Variegato di Castelfranco PGI looks like

Il radicchio variegato di Castelfranco

Radicchio Variegato di Castelfranco: a beautiful rose

Its beautiful rose shape and the play of colours of its leaves makes us associate it with a very special flower because it blooms when others are asleep, i.e. in winter. Its origin is a hybrid between radicchio and escarole from which Variegato takes a combination of characteristics.

The product bears the name of the town where the country culture of its cultivation is rooted in the history of a plain characterised by long, harsh winters during which families found shelter from the cold by gathering in the stables. It was in the stables, protected by straw, that chicories were stored to protect them from frost and, as often happens, an extraordinary method was discovered to make the plants even tastier: the forcing technique.

What is the forcing technique?

This is the technique whereby the plants are left in the dark (in ancient times under straw, today under special cloths) so that they lose their chlorophyll, the whitening process we also saw in Radicchio Tardivo. In addition to taking on their unmistakable colour, the bitter taste of the chicories fades and the leaves acquire an extraordinary crunchiness.

To enjoy Radicchio Tardivo in a slightly unusual way, try the Strozzapreti with Radicchio and pumpkin fondue.

Radimonio, my Pinzimonio with a Radicchio Variegato dip

2.2g carbohydrates per 100g

Ingredients for 4 servings

  • 300g Radicchio variegato di Castelfranco PGI
  • 150g Crescenza cheese (I used goat’s milk cheese)
  • 100g shallot
  • 50g Recioto wine
  • 1 clove garlic
  • rinds of Parmigiano Reggiano cheese
  • leaves of Radicchio di Treviso tardivo
  • extra virgin olive oil
  • pepper
  • salt

Preparation

  1. Cut the shallot into thin slices and sweat it slowly in a pan with a little extra virgin olive oil for about 10 minutes.
  2. Wash the radicchio, cut it into strips and add it to the shallots. Cook it for a few minutes over high heat while continuing to stir it with a wooden spoon. Douse Radicchio with the Recioto wine and end cooking without allowing the Radicchio to dry out too much: overall cook for about 6-7 minutes.
  3. Transfer the Radicchio into a blender or food processor, blend it to a cream, add the Crescenza cheese and blend again to make the mixture smooth and even. Season with salt and pepper.
  4. Take the Parmsan rinds remaining after eating up the cheese, scrape them with a knife to clean the outside. I like to leave them slightly thick, about 5mm, so that the inside is also slightly softer.
  5. Place a grill on the stove and heat it up to a high temperature; lay the Parmesan rinds on it and grill them on both sides until they acquire a dark golden-brown colour.
  6. Place the cream in a bowl and serve it with the warm rinds and the Radicchio tardivo leaves, both of which can be used as ‘spoons’ to scoop up the Radicchio cream.
Radimonio con croste di parmigiano grigliate e radicchio tardivo

Radimonio with grilled Parmesan rinds and Radicchio tardivo

Version with gluten of Radimonio

The recipe contains only naturally gluten-free ingredients, so no adaptation is necessary for its version with gluten.

Naturally gluten-free chocolate sweets with candied violets for Valentine’s Day: the candied flower from Parma to give a sweet scent to the palate.

Violette

Violets

Candied flowers and chocolate

Violets are the symbol of spring when their unmistakable colour begins to paint the still cold earth with purple and white brush strokes. This little flower, delicate in form and colour, bursts forth with its powerful scent to announce the magic of nature’s reawakening, which repeats itself every year like a rebirth.

Violets arrived in Parma thanks to Marie Louise of Austria, the second wife of Napoleon Bonaparte, who was Duchess of the Duchy of Parma, Piacenza and Guastalla between 1814 and 1847. The Duchess’s passion for this flower meant that many violet cultivations were planted in the area , which the monks of the Convento dell’Annunciata used to obtain the essence through steam distillation of flowers and leaves for the Duchess’s exclusive use. The fragrance created using the precious essential oil soon became famous throughout Europe under the name of Parma Violet.

Even today, at Marie Louise’s behest, her tomb in Vienna is always adorned with violets.

If the use of the violet in perfumery is no surprise, its use in cooking is certainly less well known, especially in the form of a candied sweet, made with painstaking care, artistry and charm by a few skilled hands.

Candying

The production of candied violets is closely linked to nature because, as we all know if we like to pick these fragrant flowers, their appearance along the paths and in the meadows varies according to the temperature, so the few companies dedicated to their processing have their binoculars aimed at spotting the mauve-coloured dots popping up on the horizon.

To be candied, the flowers must be quite large – as the process will reduce their size – and perfectly intact. Once carefully gathered into bunches, the violets are sprayed with fresh water to gently wash them, the stems are removed one by one, then the petals are brushed by hand with glucose syrup before being coated with caster sugar. Covered with sugar, violets are placed in tanks containing glucose and sugar, called Brillantiere, where they crystallise, taking on the appearance that characterises the finished product.

The most striking thing when eating a violet is the scent: a truly unusual experience. Personally, I only discovered in adulthood that these sweets on sale in Parma’s traditional pastry shops were real flowers treated with such passion and not sugar souvenirs for tourists!

Le violette candite sul dolcetto

The candied violets on the cake

In the month of love, a flower to eat.

I wanted to take the opportunity of Valentine’s Day, which I love celebrating in the Anglo-Saxon way (i.e. celebrating love in all its forms and not just between married couples or fiancés), to share with you this traditional preparation from my hometown because I thought you might find it nice to give a ‘bouquet’ of violets to use to make deliciously beautiful and fragrant, mouth-watering treats, to be consumed sparingly when approaching rich and precious things… like a chocolate treat! If you prefer to bake a cake, use candied violets to decorate the Lovers’ Sacher.

Where to find candied violets

In most confectioner’s shops in Parma, especially during the first months of the year, pretty packages of candied violets will pop up, ideal for having a little piece of tradition in a sweet. To be on the safe side, you can enter the realm of confectionery enthusiasts (both physical and online), the shop Dalla A allo Zucchero in the city centre, where you will find any ingredient or equipment to make your cakes, including these beautiful violets.

Chocolate sweets with candied violets

carbohydrates of shortbread bases 53.38g per 100g

carbohydrates of chocolate mousse 22.12g per 100g

Ingredients for the shortbread for 12 sweets

  • 110g wholemeal rice flour*
  • 65g butter
  • 65g brown or coconut sugar
  • 35g almond flour*
  • 25g potato starch*
  • 25g tapioca starch*
  • 10g bitter cocoa powder*
  • 1 egg
  • grated orange peel or orange paste*
  • 1 pinch of salt

Ingredients for the chocolate mousse

  • 200g fresh cream
  • 100g dark chocolate*
  • 50g milk
  • 30g egg white (about 1)
  • 30g sugar
  • 1/2 teaspoon lemon juice;
  • grated coconut*
  • candied violets*

*Ingredients whose labels must read “gluten-free” (or, in Italy, present on  Prontuario AIC)

Preparation of shortbread and mousse

  1. Prepare the shortbread by putting all the ingredients in the bowl of the planetary mixer; mix for a few minutes until the mixture is blended. Form a ball, cover it with cling film and place it in the refrigerator for the time needed to prepare the chocolate mousse
  2. Chop the dark chocolate finely; bring the milk to the boil and pour it over the dark chocolate, stirring with a whisk so that the chocolate melts completely.
  3. Whip the egg whites until stiff and add the sugar, mixing it in. Add this meringue to the melted chocolate, which will still be warm.
  4. Whip the cream until it has the texture of a Greek yoghurt (semi-whipped), then add this to the chocolate and egg white mixture. Place the mixture in the bowl of the planetary mixer and whip it for about 2 minutes with the whisk so that it is creamy, but soft. Allow to rest in the refrigerator for the time needed to prepare the shortbread bases.

Assembly of chocolate sweets

  1. Roll out the shortbread to a thickness of about 5mm with a rolling pin and cut out discs of the diameter corresponding to the tartlet mould (I use the non-stick mould for 12 muffins by Le Creusetit is very convenient because it doesn’t need to be greased), make them fit well in the hole, pierce the bottom with a fork and bake in a static oven preheated to 180°C for 10-13 minutes.
  2. If you have some shortbread left, cut some heart-shaped biscuits that you can use to decorate the sweets.
  3. Take the tartlets out of the oven and allow them to cool completely.
  4. Take a pastry bag and choose the tip you want: I chose the smooth 1.5cm diameter tip. Remove the mousse from the refrigerator, fill a pastry bag and top the tartlets as desired. Sprinkle with grated coconut and complete with a candied violet and a small biscuit.

Dolcetti per san valentino

Version with gluten of Chocolate sweets with candied violets

The recipe contains only naturally gluten free ingredients, so no adaptation is necessary for its version with gluten. If you want to use wheat flour, replace rice flour, potato starch and tapioca starch with equal amounts of wheat flour.

Krapfens with jam are one of my absolute favourite Carnival sweets, so much so that every year I force myself to make them only at Carnival, a resolution I never manage to keep!

In my family tradition, Krapfen are always prepared with potatoes and strictly with homemade plum jam, another preparation that is a must when the plums ripen on the numerous trees that colour our farm.

However, if you prefer to fill Krapfen with custard, you can do this using a pastry syringe once you have fried a single disc, perhaps left slightly thicker than in the recipe below.

So along with Chiacchiere and  Fried Creamit is a joy for me to share these irresistible Krapfens that you will enjoy at every bite… maybe even licking your fingers.

Krapfens with jam

carbohydrates 37.91g per 100g of krapfen without sugar on the surface

Ingredients

  • 500g potatoes
  • 280g plum jam*
  • 250g gluten-free cake flour mix, brand Molino Dallagiovanna**
  • 250g gluten-free bread flour mix, brand BiAglut**
  • 120g milk
  • 65g butter
  • 50g sugar
  • 3 eggs
  • 30g brewer’s yeast
  • grated rind of 1/2 lemon
  • 1 pinch of salt
  • frying oil and caster sugar for the surface

**Ingredients specific for celiacs

*Ingredients whose labels must read “gluten-free” (or, in Italy, present on  Prontuario AIC)

Preparation

  1. Knead all ingredients together until you have a smooth dough with a fairly firm texture. Roll out the dough to a thickness of about 1cm and cut disks of about 8cm in diameter. Place the plum jam on half of the discs, then close them with the remaining discs, taking care to seal the edges well, perhaps wetting them lightly with a finger moistened with water to make the dough ‘stick’.
  2. Let the Krapfen rest for 1.5 hours, then deep-fry them in plenty of oil and roll in caster sugar before serving.
La frittura dei krapfen

The frying of Krapfen


I krapfen pronti per essere gustati

Krapfens ready to be enjoyed

Version with gluten of Krapfens with jam

Replace the gluten-free flour (500g) with an equal amount of wheat flour and mix with just 100g milk and 2 whole eggs and 1 yolk.


Do you know that we are already in the Carnival period? Pastry shops and bakeries have been swarming with fried desserts for some time now, so here is a recipe for an excellent gluten-free fried cream (which you can easily adapt to the gluten version by following the directions at the bottom of the recipe) prepared with rice flour and coconut biscuits.

If I hardly ever fry during the year, especially sweets, in these cold days with so many limitations for social life, Carnival overwhelms us with numerous and delicious food temptations. So get ready to surrender: even if in moderation, I think it will be impossible not to taste Chiacchiere, Krapfen and this irresistible Fried Cream, a soft heart encased in crispy breadcrumbs.

Gluten-free Fried Cream

30.50g carbohydrates per 100g without icing sugar dusting

Ingredients

  • 500g milk
  • 150g sugar
  • 125g wholemeal rice flour*
  • 50g chopped Le Veneziane coconut biscuits**
  • 50g almond flour*
  • 25g corn starch*
  • 5 eggs
  • 1 vanilla pod
  • grated rind of 1 lemon
  • frying oil, icing sugar*, flour**

**Ingredients specific for celiacs

*Ingredients whose labels must read “gluten-free” (or, in Italy, present on  Prontuario AIC)

Preparation

  1. Heat the milk with the vanilla (e.g. an empty pod kept aside) and grated lemon peel. Allow to cool and strain the liquid.
  2. In a bowl, whisk the milk, sugar, 1 yolk and 2 egg whites, add the flour and starch, stirring with a whisk; then bring the cream to the boil on the stove and let it cook for a few minutes.
  3. Pour the cream inside a rectangular steel ring  placed on a sheet of baking paper or in a small square or rectangular baking tin covered with parchment paper and leave to cool.

Uno_chef_per_Gaia_crema_fritta
4. Once ready, cut it into cubes, dip them first in flour, then in the 2 beaten eggs and finally in the biscuit and almond flour mixture.

Uno_Chef_per_Gaia_crema_fritta_senza Glutine

  1. Fry the cubes in hot oil, dry them well with kitchen paper and finish by dusting them with icing sugar.

uno_chef_per_gaia_ricetta_gluten_free_crema_fritta

Version with gluten of Fried cream

Replace gluten-free biscuits and flour for the breading with standard products.


Yoghurt flat bread means homemade bread, which is one of the most satisfying preparations: what could be nicer than the fragrance of bread baking that fills the room? But we don’t always have time to let bread rise and bake it for 45 minutes or more. Try this simple:

Yoghurt flat bread made with baking powder and wholemeal flour.

So a convenient, homemade bread, ready in minutes: we only need 30 minutes to let the dough rest, which is the time needed to set the table, dress the salad and serve the other courses or ingredients with which to top our flat bread. And besides being able to prepare it with and without gluten, this wholemeal version is also very diabetes-friendly thanks to fibre content and yoghurt, which slow down the absorption rate of carbohydrates.

A bread from the Orient

In the cuisine of many Central and South Asian countries, as well as in the Middle East, flat and rounded types of bread are prepared that are suitable for meat, fish and vegetable dishes in small pieces, making them easy to eat as street food.

One of the most popular types of these breads is Naana bread made famous by Indian restaurants all over the world. It is served hot to accompany other dishes and seasoned with butter or ghee (clarified butter used in this cuisine) as well as being flavoured with spices and herbs.

For convenience, it is nowadays prepared using baking powder and yoghurt in the dough instead of water to make it softer. And while in India they use the characteristic clay oven called Tandoor, the oven used to cook tandoori chicken, perhaps the best-known Indian dish outside its country of origin and always present on the menus of these ethnic restaurants, we will use a simple non-stick frying pan with a thick bottom.

In this video recipe you can see how to prepare the wholemeal yoghurt bread and I suggest you serve it in the Emilian way, therefore with some of the products of this land such as Squacquerone cheese and Prosciutto di Parma, but when you have a moment of time I invite you to try it with some meat and vegetable dishes accompanied by curry and spice sauces that will certainly make you travel with flavours at this time when physically doing so is still rather difficult.

Focaccina allo yogurt farcita

Yoghurt flat bread ready to be enjoyed

Wholemeal yoghurt flat bread 

38.32g carbohydrates per 100g

Ingredients for 12 pieces

  • 400g fat free Greek yoghurt
  • 300g gluten-free wholemeal bread flour mix, brand Massimo Zero**
  • 100g brown rice flour* (you can also change the proportions and make 350g Massimo Zero Bread Mix** and 50g buckwheat flour: the dough will be darker and easier to roll out)
  • 8g baking powder*
  • aromatic herbs to taste
  • dried cherry tomatoes to taste (optional)
  • salt
  • dusting flour**

**Ingredients specific for celiacs

*Ingredients whose labels must read “gluten-free” (or, in Italy, present on  Prontuario AIC)

Preparation

  1. Mix the flour with yoghurt, baking powder and a pinch of salt until smooth.
  2. Cover it with cling film and let it rest for 30 minutes.
  3. Divide the dough into 3 parts and flavour one part with chopped herbs, a second part with dried tomatoes to taste and leave the third part plain. Finally, divide the dough into 4 pieces of each type, form them into balls, then roll them out with a rolling pin to a thickness of 3-4mm.
  4. Heat a non-stick frying pan or a smooth griddle. When it is hot, place the bread on it and cook it on both sides until brown, with darker bubbles scattered on the surface.
Cottura della focaccina

Cooking the bread

  1. Serve the bread with toppings to taste. And if you like flat bread and have a little more time available, try also potato patties.
Focaccine allo yogurt con Squacquerone,Prosciutto di Parma e rucola

Yoghurt flat bread with Squacquerone cheese, Parma ham and rocket

Version with gluten

Replace the gluten-free flour and rice flour with 400g of wholemeal wheat flour and mix it with 350g of fat free Greek yoghurt.