Some recipes are born almost by chance. From a slice of toasted bread, an ingredient waiting to be used, or a flavour combination that sparks curiosity. And very often, these are the creations that end up winning everyone over, just like my Bruschetta with beef tartare, hazelnuts and caramelised onion.
It is with this spirit that my new series, Not Your Usual Bruschetta, begins—a collection of creative and delicious ideas that transform a simple slice of bread into something truly memorable. Easy to prepare, perfect for summer, and ideal for anyone who loves experimenting in the kitchen without making life complicated.
The first star of the series is a bruschetta with bold yet perfectly balanced flavours: beef tartare with crunchy hazelnuts, caramelised Tropea onions, and artichoke pâté. A combination of textures and aromas that makes every bite both surprising and deeply satisfying, whatever the occasion.
Because, after all, this is not your usual bruschetta.
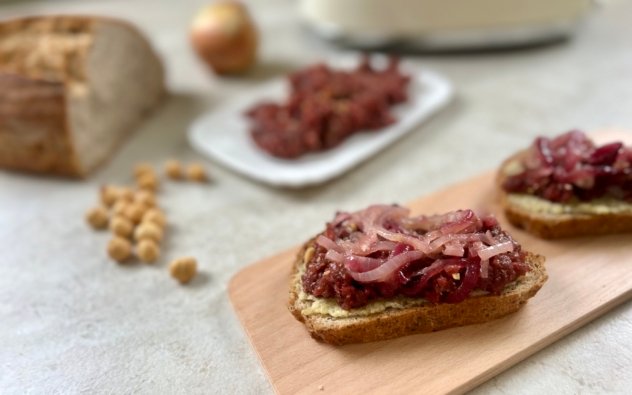
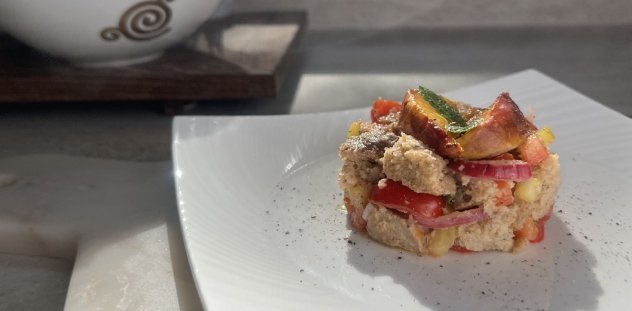
Bruschetta with beef tartare, hazelnuts and caramelised onion
39g carbohydrates for 1 bruschetta
Ingredients for 2 bruschettas
- 2 slices of bread** (50 g each)
- 150 g Tropea onions
- 120 g beef tartare
- 30 g artichoke pâté*
- 30 g hazelnuts
- 10 g brown sugar
- apple cider vinegar
- extra virgin olive oil
- salt and pepper
**Ingredients specific for celiacs
*Ingredients whose labels must read “gluten-free” (or, in Italy, present on Prontuario AIC)
Method
- Finely chop the hazelnuts and mix them into the beef tartare. Season with salt, pepper, and extra virgin olive oil, then leave to marinate while you prepare the onions.
- Thinly slice the Tropea onions and cook them gently in a non-stick frying pan with a drizzle of extra virgin olive oil and a pinch of salt. Once softened, add the brown sugar and a splash of apple cider vinegar, allowing the vinegar to evaporate completely.
- Toast the bread slices until golden and crisp. Spread a layer of artichoke pâté over each slice, top with the hazelnut beef tartare, and finish with the caramelised onions.
Nutrition Note
Beef tartare provides high-quality protein and important minerals such as iron and zinc. Hazelnuts contribute mostly unsaturated fats, vitamin E, and a pleasant crunch, while artichokes are naturally rich in fibre and plant compounds such as cynarin. The caramelised Tropea onions add sweetness and depth of flavour, creating a bruschetta that is both satisfying and well balanced.